准备环境
软件包版本
elasticsearch-6.6.0.rpm
kibana-6.6.0-x86_64.rpm
logstash-6.6.0.rpm
在做下列操作前,建议先停止Elasticsearch、Kibana
systemctl stop elasticsearch kibana如果是相同版本,可直接使用已破解好的相关 x-pack-6.6.0 文件:下载地址
反编译 x-pack-core-6.6.0.jar
下载Luyten:https://github.com/deathmarine/Luyten/release
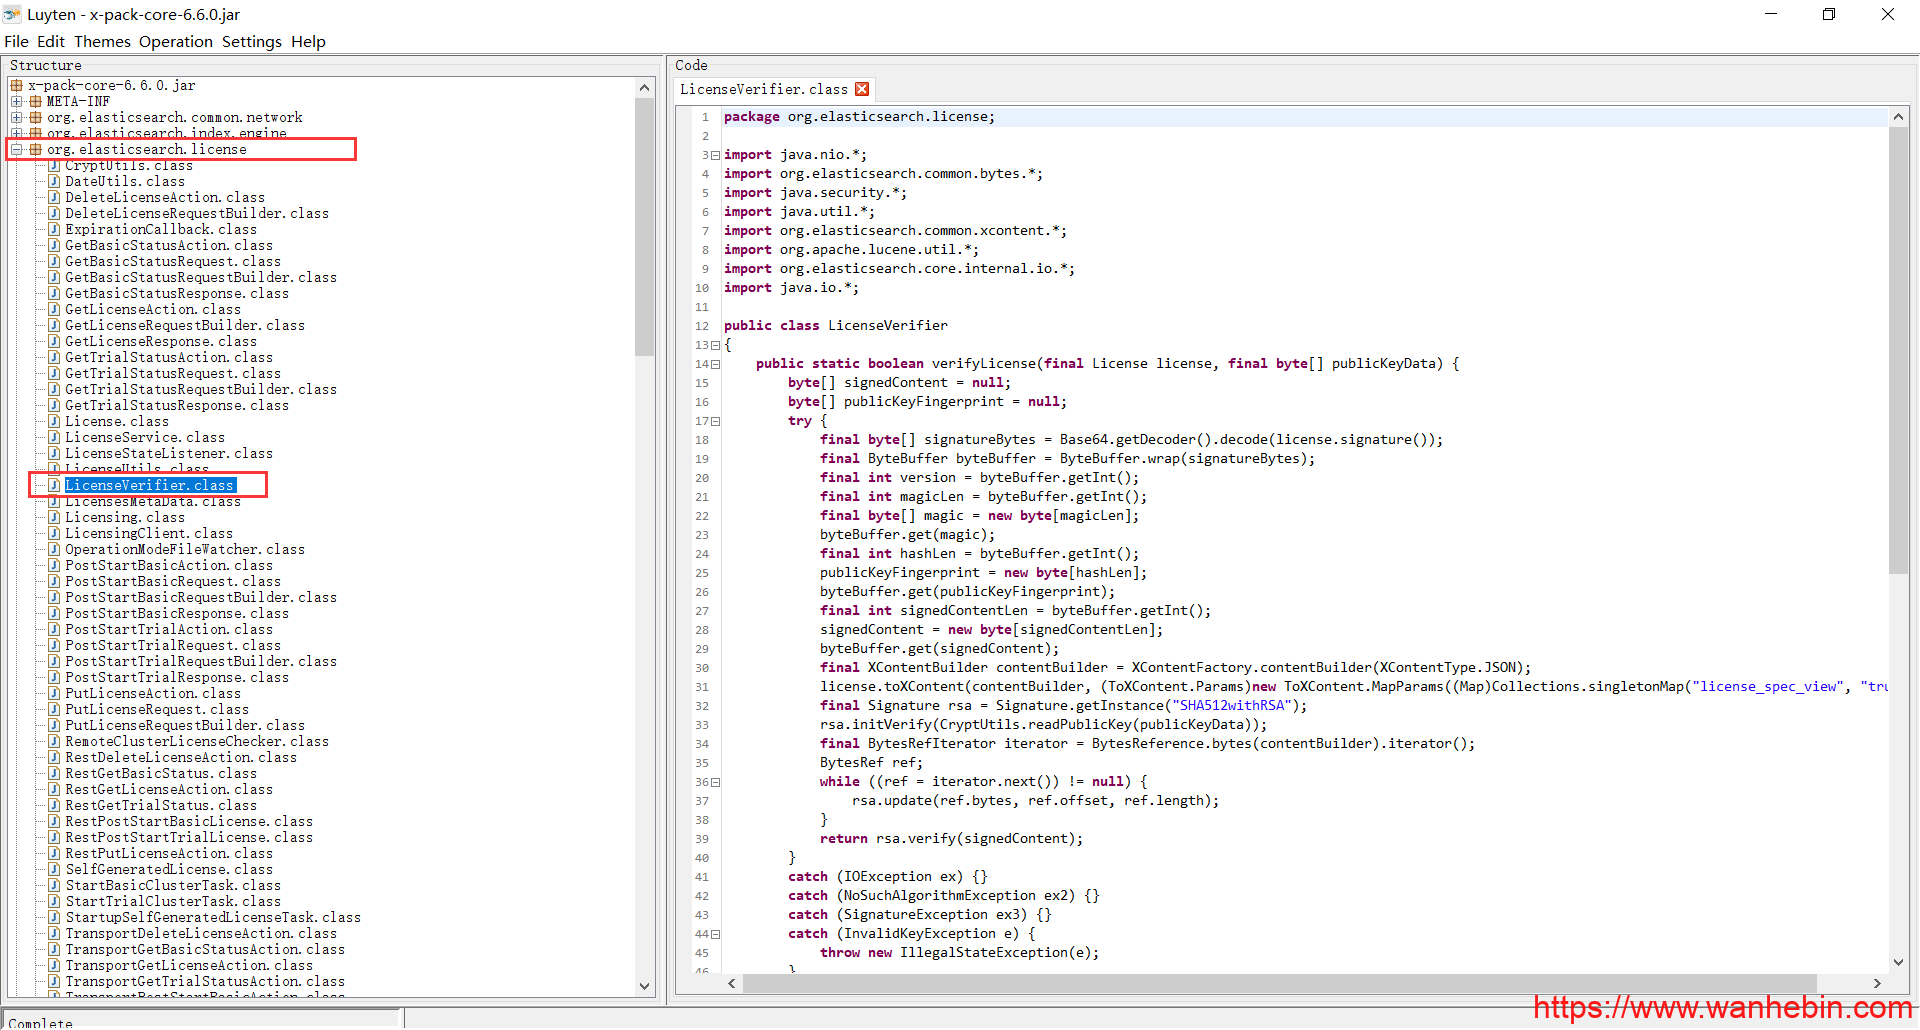
从ES服务器上把x-pack-core-6.6.0.jar 下载到PC,打开Luyten软件,并把x-pack-core-6.6.0.jar包拖入。
rpm包安装的elasticsearch插件路径:
/usr/share/elasticsearch/modules/x-pack-core/x-pack-core-6.6.0.jar
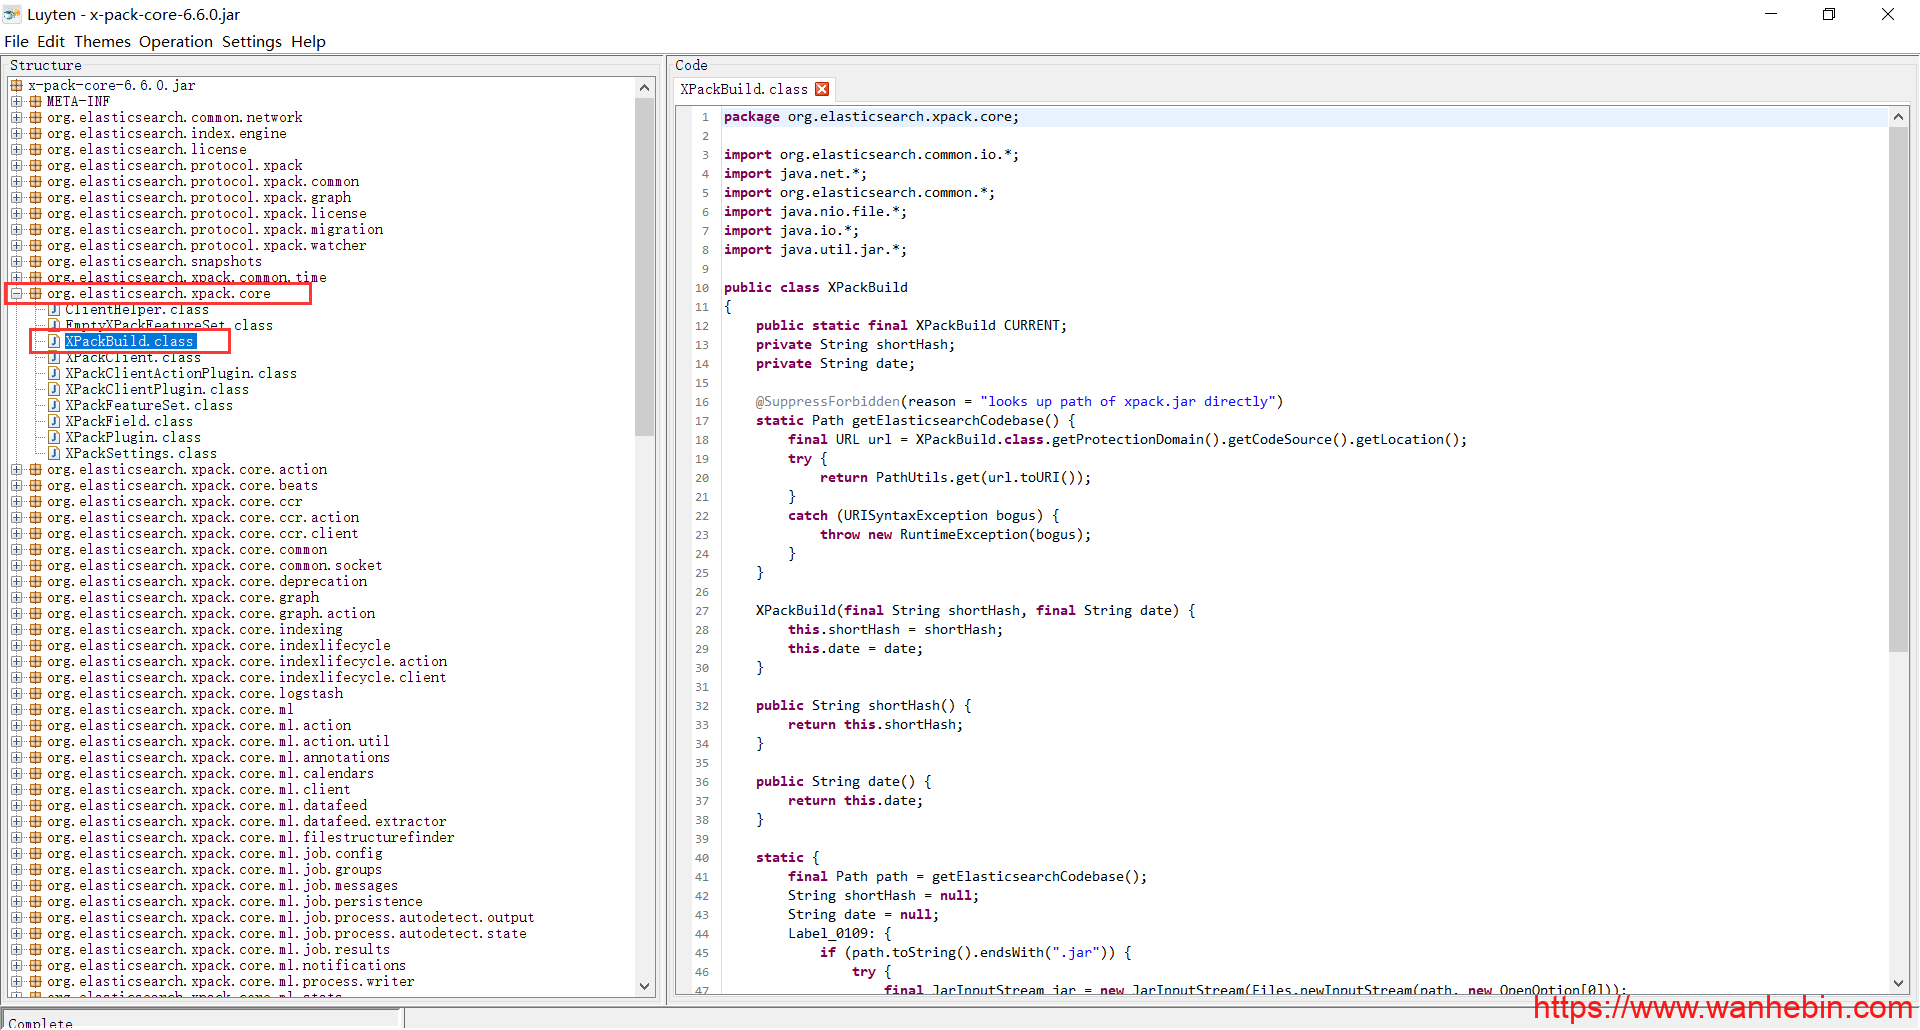
找到 org.elasticsearch.license.LicenseVerifier、org.elasticsearch.xpack.core.XPackBuild这两个文件。
选择文件后,使用 Luyten 的 Save As 提取出文件。
修改文件
1、修改LicenseVerifier.java
LicenseVerifier 中有两个静态方法,这就是验证授权文件是否有效的方法,我们把它修改为全部返回true。
package org.elasticsearch.license;

import java.nio.*;
import org.elasticsearch.common.bytes.*;
import java.security.*;
import java.util.*;
import org.elasticsearch.common.xcontent.*;
import org.apache.lucene.util.*;
import org.elasticsearch.core.internal.io.*;
import java.io.*;

public class LicenseVerifier
{
    public static boolean verifyLicense(final License license, final byte[] publicKeyData) {
        return true;
    }

    public static boolean verifyLicense(final License license) {
        return true;
    }
}2、修改XPackBuild.java
XPackBuild 中最后一个静态代码块中 try的部分全部删除,这部分会验证jar包是否被修改。
package org.elasticsearch.xpack.core;

import org.elasticsearch.common.io.*;
import java.net.*;
import org.elasticsearch.common.*;
import java.nio.file.*;
import java.io.*;
import java.util.jar.*;

public class XPackBuild
{
    public static final XPackBuild CURRENT;
    private String shortHash;
    private String date;

    @SuppressForbidden(reason = "looks up path of xpack.jar directly")
    static Path getElasticsearchCodebase() {
        final URL url = XPackBuild.class.getProtectionDomain().getCodeSource().getLocation();
        try {
            return PathUtils.get(url.toURI());
        }
        catch (URISyntaxException bogus) {
            throw new RuntimeException(bogus);
        }
    }

    XPackBuild(final String shortHash, final String date) {
        this.shortHash = shortHash;
        this.date = date;
    }

    public String shortHash() {
        return this.shortHash;
    }

    public String date() {
        return this.date;
    }

    static {
        final Path path = getElasticsearchCodebase();
        String shortHash = null;
        String date = null;
        Label_0109: {
            shortHash = "Unknown";
            date = "Unknown";
        }
        CURRENT = new XPackBuild(shortHash, date);
    }
}
编译修改后的java文件
先将修改后的文件上传到ES服务器上,再进行编译。
- 编译生成新的 class 文件
javac -cp "/usr/share/elasticsearch/modules/x-pack-core/x-pack-core-6.6.0.jar:/usr/share/elasticsearch/lib/*" LicenseVerifier.java

javac -cp "/usr/share/elasticsearch/modules/x-pack-core/x-pack-core-6.6.0.jar:/usr/share/elasticsearch/lib/*" XPackBuild.java - 覆盖原class文件
复制并解压 x-pack-core-6.6.0.jar 文件
mkdir /opt/x-pack-core-6.6.0
cp /usr/share/elasticsearch/modules/x-pack-core/x-pack-core-6.6.0.jar /opt/
unzip xf x-pack-core-6.6.0.jar -d x-pack-core-6.6.0/
cd /opt/x-pack-core-6.6.0/把LicenseVerifier.class、XPackBuild.class覆盖原文件
LicenseVerifier.class 路径:
org/elasticsearch/license/LicenseVerifier.classXPackBuild.class 路径:
org/elasticsearch/xpack/core/XPackBuild.class
重新打包并替换 x-pack-core-6.6.0.jar
- 打包
x-pack-core-6.6.0为新的 x-pack-core-6.6.0.jar
cd /opt/x-pack-core-6.6.0/
jar cvf /root/x-pack-core-6.6.0.jar *- 备份原来的 x-pack-core-6.6.0.jar,并将新的 x-pack-core-6.6.0.jar 覆盖原文件
cp /usr/share/elasticsearch/modules/x-pack-core/x-pack-core-6.6.0.jar{,.bak}

\cp /opt/x-pack-core-6.6.0/x-pack-core-6.6.0.jar /usr/share/elasticsearch/modules/x-pack-core/x-pack-core-6.6.0.jar
授权文件导入
1、禁用 x-pack security
先把禁用x-pack security,否则不能正常导入 license 文件
vim /etc/elasticsearch/elasticsearch.yml
xpack.security.enabled: false重启elasticsearch
systemctl restart elasticsearch.service2、修改授权文件
去官网申请basic授权文件:https://license.elastic.co/registration
根据邮箱里的链接下载授权文件,更改名为 license.json
修改 license.json 信息
{
    "license":{
        "uid":"654c015f-2dba-4412-b6dc-38939b36b2de",
        "type":"platinum",      #修改为白金授权
        "issue_date_in_millis":1605571200000,
        "expiry_date_in_millis":4070793600000,    #2098年过期
        "max_nodes":999,      #集群最大节点数
        "issued_to":"HEBIN (China)",
        "issuer":"Web Form",
        "signature":"AAAA........zDD1U",
        "start_date_in_millis":1605571200000
    }
}
3、导入 license
curl -XPUT -H "Content-Type: application/json" 'http://127.0.0.1:9200/_xpack/license' -d @license.json- 查看 license 授权
curl -XGET http://127.0.0.1:9200/_license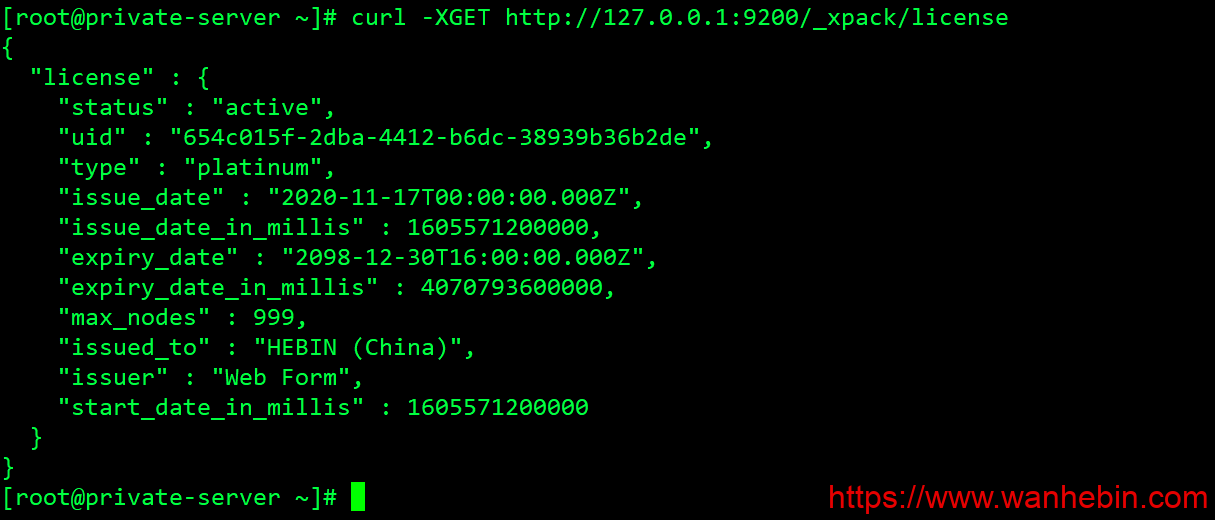
ES开启x-pack认证
- 修改配置文件
/etc/elasticsearch/elasticsearch.yml
xpack.security.enabled: true
xpack.security.transport.ssl.enabled: true- 重启elasticsearch
systemctl restart elasticsearch.service
设置ES密码
- 生成自定义密码
/usr/share/elasticsearch/bin/elasticsearch-setup-passwords interactive- 生成随机密码
/usr/share/elasticsearch/bin/elasticsearch-setup-passwords auto
Kibana开启x-pack认证
- 修改配置文件
vim /etc/kibana/kibana.yml
密码填写上一步生成的elastic用户密码
elasticsearch.username: "elastic"
elasticsearch.password: "changeme"- 重启kibana
systemctl restart kibana.service- 访问kibana页面,验证x-pack

Logstash开启x-pack认证
- 在
logstash.yml中配置验证
xpack.monitoring.enabled: true
xpack.monitoring.elasticsearch.username: logstash_system
xpack.monitoring.elasticsearch.password: xxxxxxx #填写对应用户密码- 在
/etc/logstash/conf.d/test.conf配置文件的 output 模块中配置验证验证
output {
    elasticsearch {
        hosts => ["127.0.0.1:9200"]
        index => "system-syslog-toes-%{+YYYY.MM}"
        user => "logstash_system"  #填写用户名
        password => "xxxxx"        #填写对应用户密码
    }
}- 重启logstash